OPC UA Connection - Inverted pendulum example
Do you want to connect HILO-MPC with actuators and sensors operating in the real world? HILO-MPC comes with an integrated interface to OPC UA that let you connect to external devices effortlessly.
In this example you will learn how to use the HILO-MPC OPC UA interface. We will test it with a (simulated) inverted pendulum problem, in a software-in-the-loop fashion. All the files used for this example can be found in our example repository in the folder opcua_pendulum.
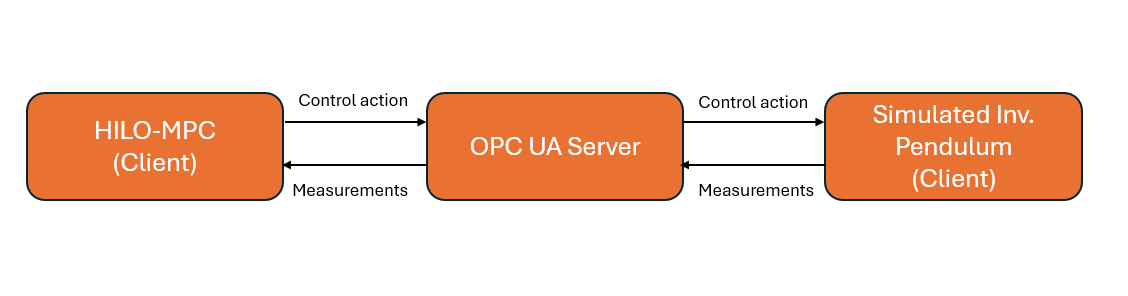
Inverted pendulum connected via OPC UA: server exposes angle/torque; controller reads/writes.
Pendulum simulation
Let us begin by starting the UPC UA server, and then the server that simulates the inverted pendulum.
In the example repository navigate to the folder opcua_pendulum and run the following commands in two separate terminal windows:
# Start the OPC UA server
python3 opcua_pendulum_server.py
Then in another terminal window run:
python3 opcua_pendulum_dashboard.py
The terminal should output something like this:
Dashboard at http://127.0.0.1:8000/ (endpoint opc.tcp://127.0.0.1:4840/freeopcua/pendulum/, ns-idx 2)
If you click on the link, you should see a dashboard on your browser that shows the pendulum. This is reading the torque from the OPC UA server and updating the pendulum position accordingly. In the next section we will build a controller that sends the torque commands to the server.
Simple control loop
HILO-MPC comes with a built-in control loop that communicates with an OPC UA server. This can be already enough for simple control tasks. If you want to have more control, you can also build your own control loop using as shown in the next sections.
We want to control an inverted pendulum in the upright position using nonlinear MPC. First, let us define the MPC controller
def build_pendulum_nmpc(Ts_ctrl: float) -> NMPC:
"""NMPC around upright using phi = theta - pi to avoid wrap at ±pi."""
model = Model()
x = model.set_dynamical_states(["phi", "omega"])  # reparameterized angle
u = model.set_inputs(["u"])  # torque

phi = x[0]
omega = x[1]
torque = u[0]

ode = [
    omega,
    (g / l) * ca.sin(phi) - (c / I) * omega + (1.0 / I) * torque,
]
model.set_equations(ode=ode)
model.discretize("erk", order=4, inplace=True)
model.setup(dt=Ts_ctrl)

mpc = NMPC(model)
mpc.horizon = 20
mpc.quad_stage_cost.add_states(names=["phi", "omega"], ref=[0.0, 0.0], weights=[25.0, 2.0])
mpc.quad_terminal_cost.add_states(names=["phi", "omega"], ref=[0.0, 0.0], weights=[25.0, 10.0])
u_max = 5.0
mpc.set_box_constraints(u_lb=[-u_max], u_ub=[u_max])
mpc.set_initial_guess(x_guess=[0.0, 0.0], u_guess=[0.0])
mpc.setup(options={"objective_function": "discrete"})
return mpc
Since the OPC UA server provides the raw angle theta, but our NMPC controller works with the reparameterized state phi = theta - pi (to avoid discontinuities at ±π), we need an adapter that bridges this mismatch. The PendulumNMPCAdapter wraps our NMPC controller and performs three key tasks:
State transformation: Converts the raw angle theta from the server to phi = theta - pi
State augmentation: Estimates the angular velocity omega using finite differences between successive angle measurements
Interface compatibility: Provides a SimpleControlLoop-compatible optimize(x) method that the OPCUASimpleControlLoop can call
Here is the adapter implementation:
class PendulumNMPCAdapter:
    """Adapter presenting a SimpleControlLoop-like optimize(x) for OPCUASimpleControlLoop.

    The incoming x is a 1-element vector [theta]. We internally construct
    [phi, omega] and call the wrapped NMPC.optimize().
    """

    type = "NMPC"  # so OPCUASimpleControlLoop treats this as MPC for optimize()

    def __init__(self, nmpc: NMPC, Ts_ctrl: float) -> None:
        self.nmpc = nmpc
        self.Ts = float(Ts_ctrl)
        self._phi_prev: Optional[float] = None

    @staticmethod
    def _wrap_to_pi(a: float) -> float:
        while a <= -math.pi:
            a += 2 * math.pi
        while a > math.pi:
            a -= 2 * math.pi
        return a

    def is_setup(self) -> bool:
        return True  # underlying NMPC already set up

    def optimize(self, x: Sequence[float], cp=None):  # SimpleControlLoop-compatible
        theta = float(x[0]) if len(x) > 0 else 0.0
        phi = self._wrap_to_pi(theta - math.pi)
        if self._phi_prev is None:
            omega = 0.0
        else:
            dphi = self._wrap_to_pi(phi - self._phi_prev)
            omega = dphi / self.Ts
        self._phi_prev = phi
        return self.nmpc.optimize([phi, omega], cp=cp)
Now we instantiate the adapter with our NMPC controller:
nmpc = build_pendulum_nmpc(Ts_ctrl)
ctrl = PendulumNMPCAdapter(nmpc, Ts_ctrl)
We then need to map the control actions and measurements from the HILO-MPC model to the OPC UA server nodes.
# Explicit mapping and loop
mapping = IOMapping(
    reads={
        "theta": {"node": f"ns={args.ns_idx};s=Pendulum/Angle_rad"},
    },
    writes={
        "u": {"node": f"ns={args.ns_idx};s=Pendulum/Torque_Nm"},
    },
)
Finally we can start the control loop by running
loop = OPCUASimpleControlLoop(
    endpoint=args.endpoint,
    mapping=mapping,
    controller=ctrl,
    estimator=None,
    state_aliases=["theta"],
    control_aliases=["u"],
    parameter_aliases=[],
    period=args.Ts_ctrl,
    reconnect_backoff=tuple(args.reconnect),
    safe_shutdown={"u": 0.0},
)

print("OPC UA pendulum (OPCUASimpleControlLoop) started. Ctrl+C to stop.")
loop.run_sync(max_iters=args.iters)
The full code that uses the OPCUASimpleControlLoop is the file opcua_simple_control_loop.py in the example folder. When you run this script
python3 opcua_simple_control_loop.py
you should see the pendulum moving to the upright position as the controller sends torque commands to the OPC UA server. When you terminate the script, the safe shutdown command will set the torque to zero. You should see the pendulum moving to resting position downwards.
Flexible control loop
While OPCUASimpleControlLoop is convenient for basic applications, you may need more control over
the execution flow for advanced scenarios such as:
Custom logging and data collection
Complex state estimation or filtering
Conditional logic between reading sensors and computing control actions
For these cases, HILO-MPC provides the OPCUAConnector class, which gives you direct access to
read and write operations while you manage the control loop yourself.
The full code of the flexible loop can be found in the example repository as opcua_pendulum_controller.py. This file
is basically an alternative to opcua_simple_control_loop.py, providing more flexibility for advanced use cases.
Setting up the OPC UA connector
First, create an OPCUAConnector instance with the same I/O mapping as before:
from hilo_mpc import OPCUAConnector, IOMapping

mapping = IOMapping(
    reads={
        "theta": {"node": f"ns={args.ns_idx};s=Pendulum/Angle_rad"},
    },
    writes={
        "u": {"node": f"ns={args.ns_idx};s=Pendulum/Torque_Nm"},
    },
)

connector = OPCUAConnector(
    endpoint=args.endpoint,
    mapping=mapping,
)
connector.connect()
The connector provides two key methods: read() to fetch measurements from the OPC UA server,
and write() to send control actions back.
Building a custom control loop
With the connector, you can now build your own control loop with full flexibility:
import time

# Build controller and adapter as before
nmpc = build_pendulum_nmpc(Ts_ctrl)
ctrl = PendulumNMPCAdapter(nmpc, Ts_ctrl)

try:
    while True:
        t_start = time.perf_counter()

        # Read current state from OPC UA server
        measurements = connector.read()
        theta = measurements["theta"]

        # Compute control action
        solution = ctrl.optimize([theta])
        u_opt = solution.u[0, 0]

        # Write control action to OPC UA server
        connector.write({"u": u_opt})

        # Optional: Log or process data here
        print(f"θ={theta:.3f} rad, u={u_opt:.3f} Nm")

        # Wait for next control cycle
        elapsed = time.perf_counter() - t_start
        time.sleep(max(0, Ts_ctrl - elapsed))

except KeyboardInterrupt:
    print("\nShutting down...")
    connector.write({"u": 0.0})  # Safe shutdown
finally:
    connector.disconnect()
This custom loop gives you complete control over timing, error handling, and data processing. You can:
Add customized filters or observers between reading and optimization
Implement multi-threaded control with separate read/compute/write tasks
Store data to files or databases during operation
Handle connection failures with custom retry logic
You can run the flexible control loop script with:
python3 opcua_pendulum_controller.py
(remember to start the server and dashboard first as shown previously). You should see the pendulum moving to the upright position as before.
Comparison: Simple vs. Flexible approach
Choose OPCUASimpleControlLoop when:
You have a straightforward sense-compute-actuate cycle
Standard timing and error handling is sufficient
You want minimal boilerplate code
Choose OPCUAConnector with a custom loop when:
You need fine-grained control over execution order
You want to add custom processing between control steps
You need to integrate with other systems or data pipelines
You require custom error handling or logging strategies
Both approaches use the same underlying OPC UA communication layer, so you can start with the simple approach and switch to the flexible one as your requirements grow.
Security and Authentication
In production environments, OPC UA servers typically require authentication and encrypted communication.
HILO-MPC supports both username/password authentication and certificate-based security through optional
parameters available in both OPCUASimpleControlLoop and OPCUAConnector.
Username and Password Authentication
The simplest form of authentication uses username and password credentials:
loop = OPCUASimpleControlLoop(
    endpoint="opc.tcp://192.168.1.100:4840/secure/server/",
    mapping=mapping,
    controller=ctrl,
    username="operator",
    password="secure_password",
    period=0.02,
)
The same parameters work with OPCUAConnector:
connector = OPCUAConnector(
    endpoint="opc.tcp://192.168.1.100:4840/secure/server/",
    mapping=mapping,
    username="operator",
    password="secure_password",
)
Certificate-based Security
For higher security requirements, OPC UA supports certificate-based encryption and signing. You need to provide the security mode, security policy, and paths to your certificate and private key files:
loop = OPCUASimpleControlLoop(
    endpoint="opc.tcp://192.168.1.100:4840/secure/server/",
    mapping=mapping,
    controller=ctrl,
    security_mode="SignAndEncrypt",
    security_policy="Basic256Sha256",
    cert_path="/path/to/client_cert.der",
    key_path="/path/to/client_key.pem",
    username="operator",
    password="secure_password",
    period=0.02,
)
Available Security Modes
The security_mode parameter accepts the following values from the OPC UA specification:
"None": No security (default, used in examples)"Sign": Messages are signed but not encrypted"SignAndEncrypt": Messages are both signed and encrypted (recommended for production)
Available Security Policies
The security_policy parameter determines the cryptographic algorithms used:
"None": No security policy"Basic128Rsa15": RSA 1.5 encryption with 128-bit AES (deprecated, use only for legacy systems)"Basic256": RSA OAEP encryption with 256-bit AES"Basic256Sha256": RSA OAEP with SHA-256 (recommended)"Aes128_Sha256_RsaOaep": Modern algorithm suite with AES-128"Aes256_Sha256_RsaPss": Strongest algorithm suite with AES-256 (recommended for high security)
Note
The security policies available depend on the server configuration. Consult your OPC UA server documentation to determine which policies are supported.